Beginner's guide to game development with Unity 3D
What is Unity3D anyway?
Unity is a powerful development tool for building 2D and 3D games for over 25 different platforms. It provides a robust, real-time engine used to create fantastic, popular games on many platforms, especially mobile platforms and VR/AR experiences. It is also a complete development environment that uses the C# language for development!
And what am I gonna learn from this guide today?
-
What you can build with Unity
-
How to use Unity
-
The basics of C#
-
How to build Unity projects
Alright, but how do I install it?
Click here for a step-by-step installation process.
Also, you need the following tools and technical specifications before we go ahead:
- Unity version 2018.1.1 (this version is required, please don’t use any other version)
- 15GB of storage available.
- Admin access to the computer you’re using, especially the password.
- The text editor of your choice.
Okay! I’m done with installation, what next?
You are going to write code for a really cool car racing game! Just navigate to this URL to test the game..

How am I going to do this?
You need the following applications on your PC:
1) The project folder - you need to download this from Car Racing Project.
2) Unity Hub - download from Unity Hub.
3) The Unity Editor - download version 2018.1.1 from Unity Versions. 4) The text editor of your choice (we suggest you use Visual Studio Code for ease).
WAIT! When you install Unity, it will ask if you want to install Visual Studio. Select NO - this is NOT the same thing as Visual Studio Code!
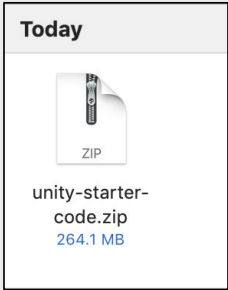
Downloading Project Files
Navigate to the Unity Starter Code to download the project! Note - it might take a long time to download. It’s a huge file!
.png)
You can see the download button at the top right side.
The next part has instructions for unzipping the files. Please note that a tool like WinRAR or 7Zip (free) will be much faster than the built-in archive tools for windows.
Windows Extraction ( WinRAR or 7Zip recommended for faster speed)
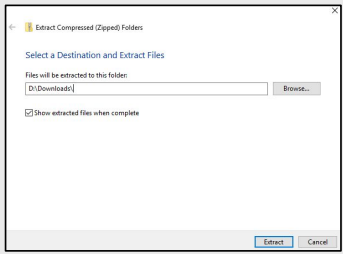
1) Open Downloads folder. 2) Right click on unity-starter-code. 3) Click Extract All.
.png)
4) Delete unity-starter-code from the end of the filename. 5) Click Extract
Please use the picture below for reference.
MAC Extraction
1) Open your downloads folder. 2) Double click the zip file. It will unzip automatically.
Let’s get cracking!
Downloading Unity Hub
1) Navigate to Unity Hub and select Try Personal.

2) Accept the terms and select Download Unity Hub.
.png)
Installing Unity Hub
3) Open the installer.
4) Running the installation will
require you to agree to the
Unity terms of service.
5) Once you’ve installed it, we can open up Unity Hub!
.png)
6) The Windows installation will provide the option for selecting what disk drive you want the installation to be on. You can simply use the location it recommends.
7) The OS X installation will require you to drag the Unity Hub.app icon into the Applications folder.
Successful Installation
After a few minutes of installing, Unity Hub should now be installed on our system. Both Windows and OS X installers should open Unity Hub after a successful installation. If not, open it up!
.png)
Creating a User ID
1) To create an ID we need to navigate to the Sign in menu, in the top right corner of Unity Hub.
2) When the Sign in window appears, we can click ‘Create One’ which will open up an account creation form.
3) Follow the prompts and fill in the form to create your Unity Account.
If you choose to use Facebook or Google Accounts to establish a Unity Account, a separate Log in screen for either service will load within Unity Hub.
5) If you sign up with an email, you will need to confirm your email address.
6) Click the confirmation link sent to the email you provided.
.png)
Great! You’ve got Unity Hub installed. Let’s get familiar!
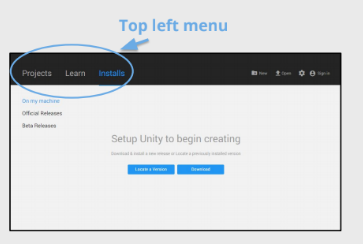
Unity Hub UI
From the Hub UI there are all the different things we have access to:
● Here we can access all of our Unity installs (the versions of Unity we have on our computer) under the Installs tab
● We can access all of our ongoing Unity projects within the Projects tab
● And within the Learn tab we can find Unity tutorials and resources
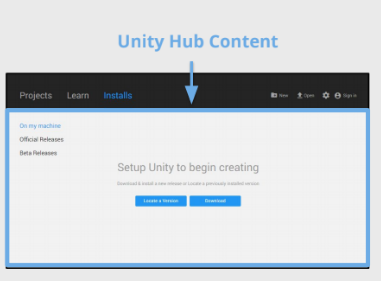
● This area displays the Unity Hub content. Content from the Projects, Learn and Installs tabs are displayed here.
Installing Unity
- Download Unity 2018 (2018 1.1f1) through the Unity Download Archive.
- Choose Unity 2018 x from it.
- Unity can be downloaded directly to your machine with either the Downloads(Mac) or Downloads(Win) buttons.
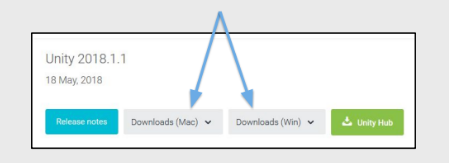
This will download the Unity Install Assistant and guide you through the installation process. You can also download this version through the green Unity Hub button.
-
You’ll notice a checklist. Select only: 1) Unity Editor 2) Standard Assets 3) Documentation
-
Then select Microsoft Visual Studio Community. VSCode is lighter and smaller to download. (Other editors can also be used).
And we’re off!
From Unity Hub, we can import our project to Unity. It will then load and compile everything required.
-
The Open tab will let you select a folder to load.
-
On Windows, you will need the WindowsStandaloneSupport and for Mac users, you need MacStandaloneSupport from the Installed Build Targets. Once chosen, click Open and load the game. If you did not change your Build Target, select Switch Target when the notification pops.
The following window will open:
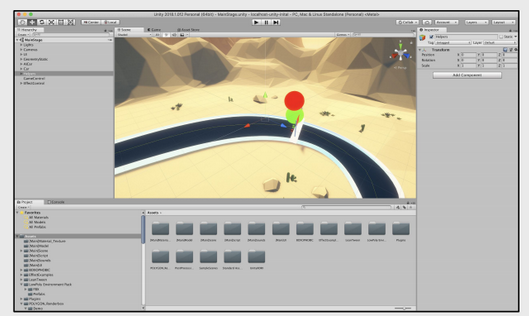
The Scene Hierarchy
The project we opened in Unity is packed full of content and the Hierarchy window is able to show us everything that is in the current scene. We can navigate the files to see all of this. By selecting an asset within the Hierarchy window, we can find and select objects live in the scene window.
- Try selecting the MainCamera object Cameras > CarCameraRig > Pivot > MainCamera
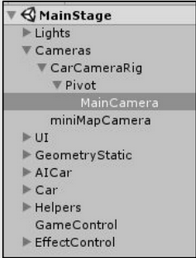
● If we select the MainCamera in the Hierarchy window, we are provided with a preview of the camera objects initial view. It shows the view of our Camera object in the scene.
- Now, try selecting the Car object
● If we choose another asset, such as the Car or AICar, we can see the objects become the area of focus and become outlined within the scene window.

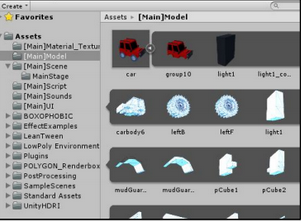
The Project Window
● The Project window provides a list of every single item within our Unity project.
● We can use this to open Scripts, find assets to add into scenes and locate anything else incorporated in our project.
● The Project window provides several abilities such favoriting items, and a text search field. These make it faster to find items or relocate frequently used content.
Inspector Window
● Any time we select an object in our Scene window, you might notice the Inspector window changes too.
● It loads up important details about whichever object we have selected at the time.
● If we select objects in the Scene window, Hierarchy window or Project window, the details will still display within the Inspector view.
● Within the Inspector, we can apply, remove and control the Components we apply to game objects. We will explore Components more later!
Scene Window
● It’s here we can add, remove and manipulate models, scenery and any other type of asset you have in the scene!
● Knowing how to control game objects inside a scene is an essential skill in Unity.
The 3D World
We can drag 3D Assets directly into the scene to create content. Unity provides numerous built-in assets for the project!
-
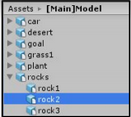
In our Project tab, let’s navigate to an asset e already have. Select:
Assets > Model > Rocks > Rock1
-
Then drag that file into our scene and a new D object will appear! It’s really that simple.
-
In the top right corner, a drop down menu provides several layout configurations. These will reposition the entire Unity Editor layout.
-
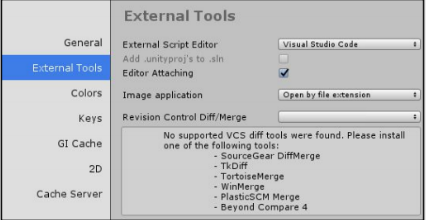
To edit code, a text editor or IDE is essential. Go to Preferences > External Tools > External Script Editor
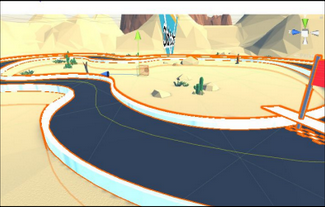
Finally! Car Racing Game.
The features it includes are:
- Player vs AI
- Collision Detection
- Keyboard Input Controls
- Interactive Menu
Let’s Test This Out
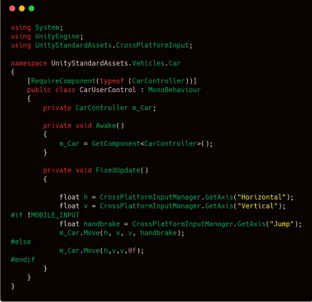
In order to move the car, we will now use C#
CarUserControl.CS
Open the file CarUserControl.cs. The path is:
Standard Assets > Vehicles > Car > Scripts > CarUserControl.cs
With the help of C#, we shall now complete the missing code.
What does that code do?
-
Horizantal and Vertical are axis values.
-
They define our input as going forwards/backwards or left/right.
-
By accessing them from the Unity API, we can tell if a user is pressing a key that should make our car go forwards, backwards or make a turn.
-
The Unity Input Manager is where input axis and game actions are defined.
-
This is what our GetAxis() performs for us.
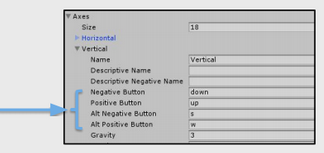
Project Settings
Input Manager Path:
Edit > Project Settings > Input > Axes > Vertical
Set it as follows:
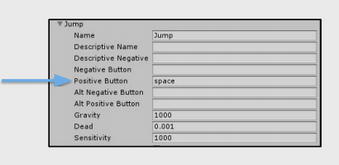
For Jump:
Edit > Project Settings > Input > Axes > Jump
Set it as follows:
The Final Script would look like this:
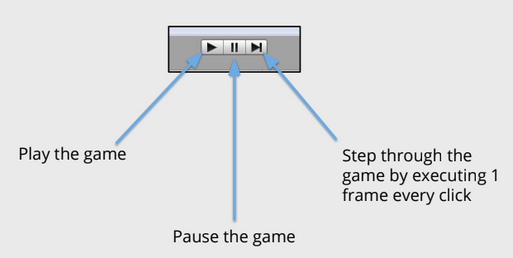
Test Run!
Press the play button on the top of the window!
Hold on, you can drive through WALLS. WHAT?
Now we introduce Colliders!
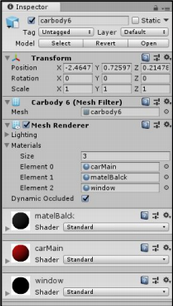
- Left click an object inside the scene. It will bring up the Inspector tab.
Set it as follows:
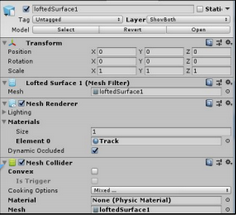
Great! What do I do about the other wall?
Add Component > Physics > Mesh Collider
Let’s take this game for a test run!
Publishing Builds
-
Access the Build menu by going to File > Build Settings
-
Try choosing ‘Pc, Mac & Linux Standalone’ in the platform selection.
-
Select ‘Build’ at the bottom of the window, a new window will open up to select where to save the build of the game.
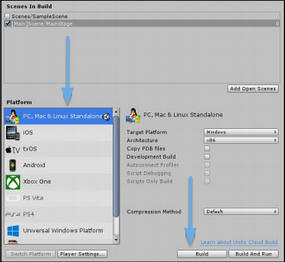
You now have an executable of this project! Try running it in your machine!
Congratulations on building your first 3D game with Unity!
